vRealize Automation 8 やってみた⑦ ブループリント(Cloud Template)
前回まではこちら
vRealize Automation 8 やってみた ① 導入編
vRealize Automation 8 やってみた ② クイックスタート編
vRealize Automation 8 やってみた③ クラウドアカウントの登録
vRealize Automation 8 やってみた④ Cloud Zones or Virtual Private Zones
vRealize Automation 8 やってみた⑤ タグの設定
vRealize Automation 8 やってみた⑥ プロジェクト
6回目まででおおよその下準備が整ったので今回はCloud Templateの作成を行います。
デフォルトのテンプレートだと細かい指定は行えない為少し手をいれて、ユーザがデプロイリクエストを行う際にCPU、メモリの指定、ネットワークの指定、追加ディスクの指定etcを行えるような形のテンプレートを作成します。

①[Design]-[Cloud Template]-[NEW FROM]-[Blank canvas]をクリックします。

②[name][project]を入力及び選択し、[CREATE]をクリックします。

③vSphere-[Machine1つ、Network2つ、Disk1つ]をドロップします。

④オブジェクトを繋げます
 ⑤オブジェクトを繋げCodeのimageをクリックし、利用可能なイメージを選択します。
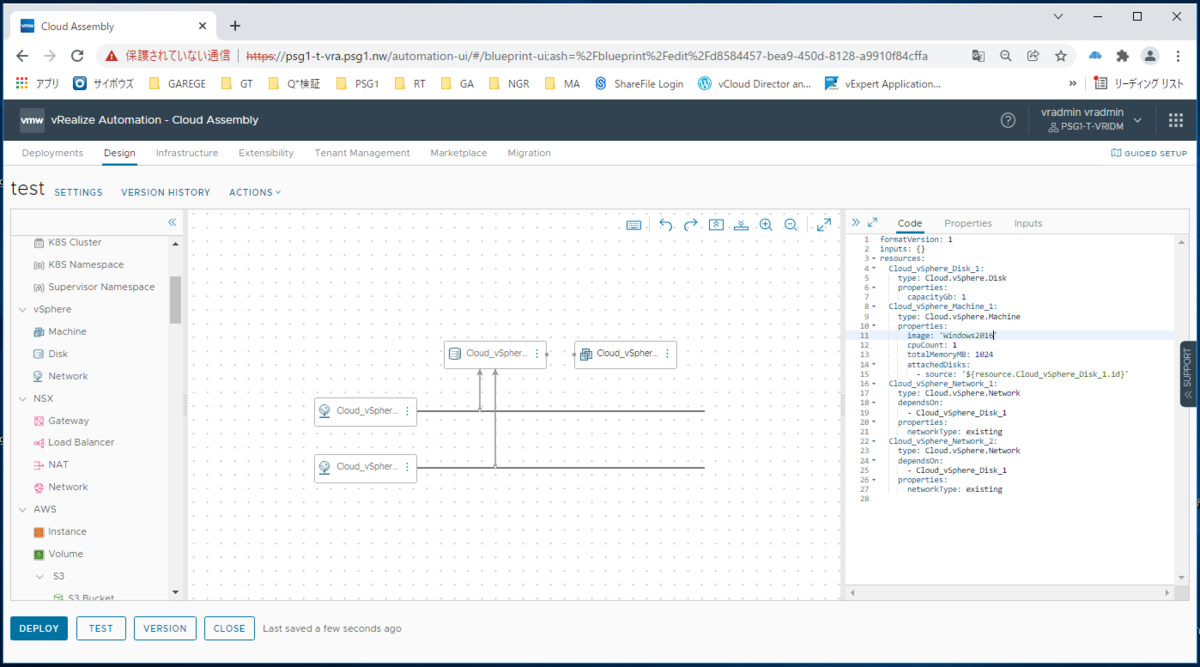
⑤表示上は右のyamlにエラーは見られななりましたが、現段階でデプロイ時に全くカスタマイズが行えない状態のyamlになってます。
インプット項目にに色々と入力し各々指定可能にしてあげます。

⑥インプットの項目が非常に長くなりました。
事項でどのような設定が施されているのか説明します。

⑦インプットに事前に定義しておきリソースはインプットの指定に従うような形のCloud templateが完成しました。下記は一例です。CPUやmemoryのデフォルト、カウント等はそのまま利用できますがNetwork等に関してはTagsから引っ張ってくる為事前の設定が必要です。
vRealize Automation 8 やってみた⑤ タグの設定
formatVersion: 1
inputs:
vmname:
type: string
title: VM name
image:
type: string
enum:
- Windows2016
- Windows2019
- Windows2016_thin
- Cent8
title: Select a image
cpucount:
type: number
default: 2
title: CPU Count
cpupersocket:
type: number
default: 2
title: CPU core per sokcet
memory:
type: number
default: 4096
title: Memory Size (MB)
boot_disk:
type: number
default: 50
title: Boot Disk Size (GB)
attach_disk:
type: number
default: 100
title: Attach Disk Size (GB)
network1:
type: string
enum:
- VLAN-165
- VMnetwork2
- VLAN-170
title: network1
network2:
type: string
enum:
- VLAN-165
- VMnetwork2
- VLAN-170
title: network2
resources:
Cloud_vSphere_Machine_1:
type: Cloud.vSphere.Machine
properties:
name: '${input.vmname}'
image: '${input.image}'
cpuCount: '${input.cpucount}'
coreCount: '${input.cpupersocket}'
totalMemoryMB: '${input.memory}'
networks:
- network: '${resource.Cloud_vSphere_Network_1.id}'
- network: '${resource.Cloud_vSphere_Network_2.id}'
attachedDisks:
- source: '${resource.Cloud_vSphere_Disk_1.id}'
storage:
bootDiskCapacityInGB: '${input.boot_disk}'
Cloud_vSphere_Disk_1:
type: Cloud.vSphere.Disk
properties:
capacityGb: '${input.attach_disk}'
provisioningType: thin
dataStore: Nutanix
Cloud_vSphere_Network_1:
type: Cloud.vSphere.Network
properties:
constraints:
- tag: 'Network:${input.network1}'
Cloud_vSphere_Network_2:
type: Cloud.vSphere.Network
properties:
constraints:
- tag: 'Network:${input.network2}'

⑧TESTをクリックします。

⑨様々なリソースを設定可能なCloud templateとなっている事がテスト時の項目からわかります。もろもろ入力し、TESTをクリックします。

⑩テスト結果がSuccessfulで表示され正常に使えそうなことが分かります。

⑪バージョンをクリックします。

⑫virsionに番号を入力し、Releaseにチェックを入れ、CREATEをクリックします。
※Releaseに☑を入れないと利用可能にはなりません。

⑬Closeをクリックします。
以上でCloud Templateの作成は終了です。次回からはセルフサービスポータルへの公開方法や承認の設定方法等を紹介します。